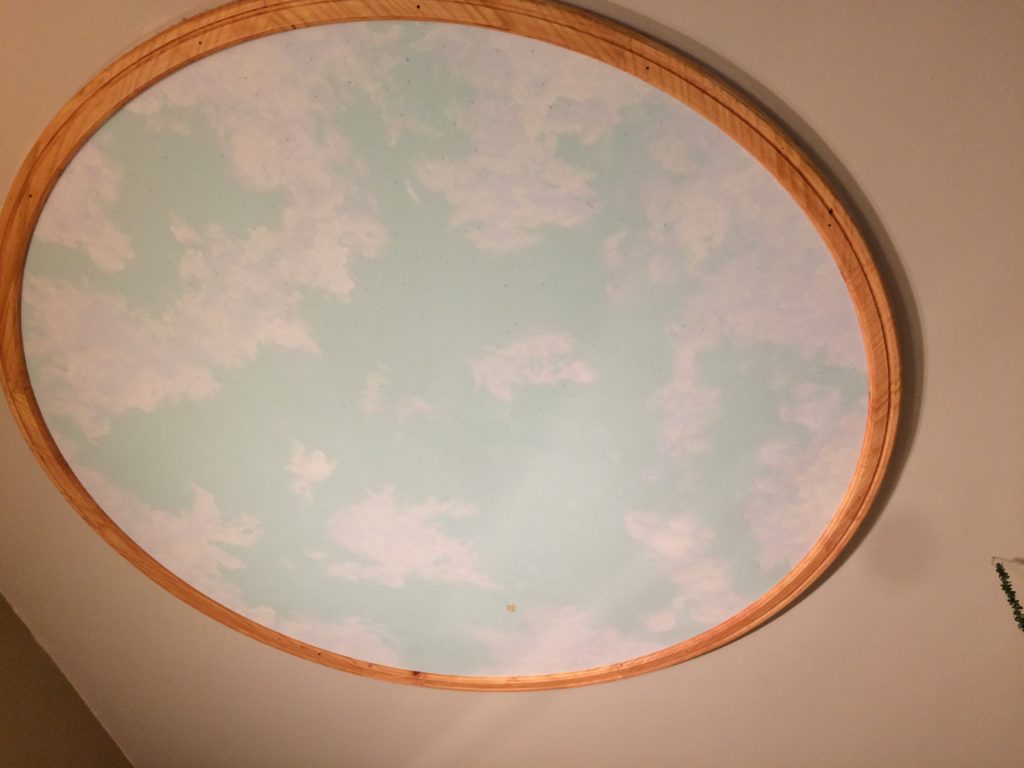
The above is the inscription on the starfield portal we made in Delilah’s room before she was born. It represents the precise moment the stars aligned over our house when Amanda broke the news. Fortunately it was captured and tagged by her camera. This kicked off this whole series and ultimately this website, so lets start there. This project features an 8′ diameter portal as a replacement for the boring ol’ ceiling lamp occupying the space. It’s very adjustable and can provide a good amount of light to the room if desired, but usually we just use it for ambient night light and so it’s pretty low. D is pretty entertained with the twinkles and colors it can do so its safe to say its pretty multi-purpose.
Materials:
- 2 Sheets of 1/2″ foam from Home Depot.
- 8.5′ length of vinyl flooring with paper backing (the cheap stuff).
- 1 Lightbox off ebay (this kit included color changing LED and mechanical light wheel for “twinkle” effect, as well as assorted fibers.
- Latex Paint (mainly blue & white).
- 5/8″ wood plank.
- Additional white flashlight(s?).
- Some PVC fittings to customize the extra light channels.
- Epoxy.
- Wood Stain.
- Hidden head hex screws.
- Wire & nails for structurally securing assembly to joists in attic.
- External power supply.
- Basic electrical wiring to add outlet in attic.
Tools:
- Router + basic circle jig
- Jigsaw
- Drill
- Paintbrushes
- Projector
- Astral calculation website.
- Vinyl cutter
So this all started with me plugging in my specifications on this website– which, btw is incredible and without which this project probably wouldn’t have happened (accurately, anyway! thanks so much to Dominic Ford) So plug in the time, date, and location and you can get back a nice high (enough) resolution starmap to use for construction. You’ll have to play around to get your variables dialed in and a map exported. I customized the background to make it black, for example. I’d also uncheck “deep star”, & “show daylight” if you’re moment is undesirably illuminated, but as you can see there are plenty of adjustments available. Of course you can skip this part to make it easy on yourself- it will still look pretty cool, but since you have to drill and finish 1000 holes anyway, why not make it special?
Ok, I’m getting ahead of myself a bit. Let’s talk about the construction first:
Believe it or not, this was initially meant to be a 3d system- meaning it would form a partial hemisphere- either concave (harder due to ceiling joists) or convex (troublesome because our ceilings are pretty normal height and so it would intrude into the space a bit). Anyway, for historical record I will say that I mostly succeeded in forming a dome by drooping an 8′ fiberglass fabric over an offset little brick-stonehenge in the room and then painting on resin. It was ok.. but as client work was getting heavy along with my wife- I finally talked myself into taking the “easy” route and doing a flat rendition and trashing the fiberglass plan. But if you wanna try that- more power to ya!
Ok, back to reality: Foam- why foam? primarily because it’s cheap and lightweight. Anything heavy is going to pull down and stress the rest of the assembly needlessly. Also, because many of our fibers need to make an immediate 90 degree bend from the surface back to the light source. If you pull those fibers once they’re set they can make themselves a nice appropriate bend without kinking into the foam. It helps to put an x-acto slice in there first to hold them in place.
I wish I could have found an 8′ x 8′ piece of material but if you’re like me, the best you’re going to find is 4×8′. So I bonded two sheets together with epoxy, and then laminated them with vinyl flooring (because you CAN buy that pretty cheaply off rolls that are 10′ long or more). I actually laminated vinyl side facing the foam thinking the paper side would be easier to detail. I guess that was still a good decision, but be very careful with it- it cracks easier than you’d expect. Because it has both some hardness and flexibility this lamination successfully eliminated the bonded seam in the foam pretty handily. Then you just have to trim it to a roughly 8′ (or whatever size you like) circle and you’re done, but leave a bit extra for now if you can.
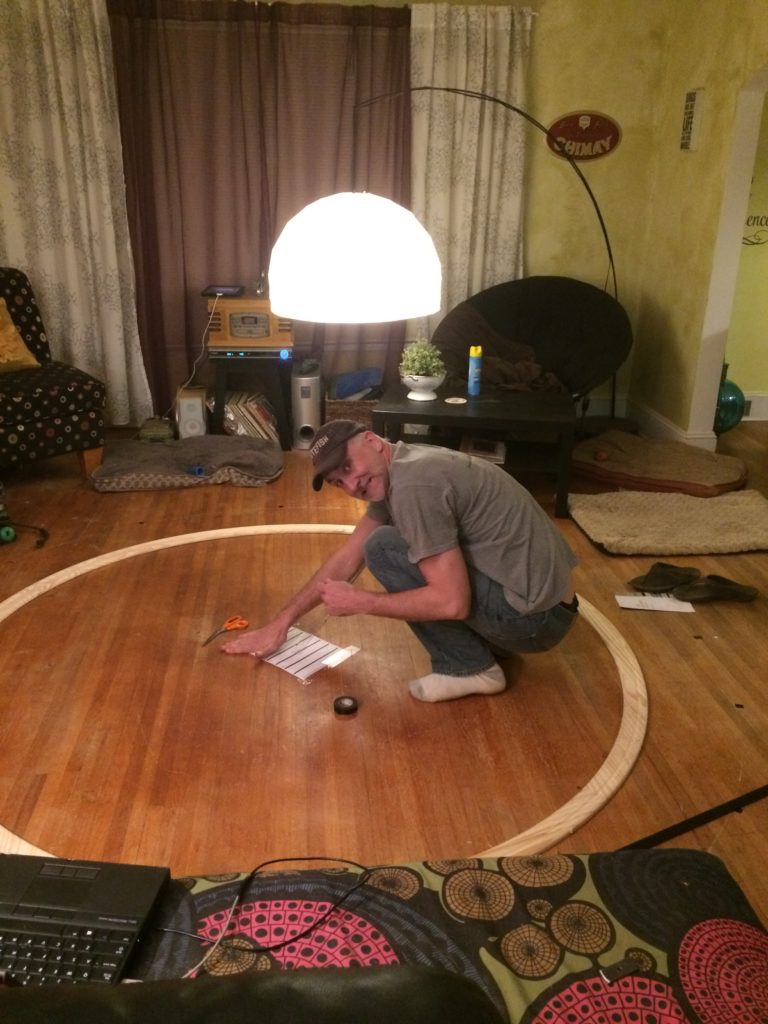
The wood trim piece was a little tricky- I think it was a pretty basic hardwood plank. I should see if I can figure out the details a little more because I had to lay out assorted arcs pretty strategically to get a full 8’+ diameter circle from a rectangular plank. Anyway- work that out. After bonding assorted arcs together I rough cut them with the ever handy jigsaw, and then- lacking in space and wisdom laid them out on the hardwood floor in my living room. Everything went better than you’d expect until some still unknown height adjustment anomaly had me drift an additional 8′ arc into my livingroom hardwood. But that repair is a story for another day.
As hard as that wooden ring was to make I surely got some great use out of it- it was key to firstly the fiberglass plan cited above, but later after the design pivot it was the thing that indexed everything else and is currently the main thing holding the entire assembly to the ceiling. Also, as a design detail, it has the lettering (date/time/inscription) and I’m still mulling the idea of adding additional lighting around the perimeter.
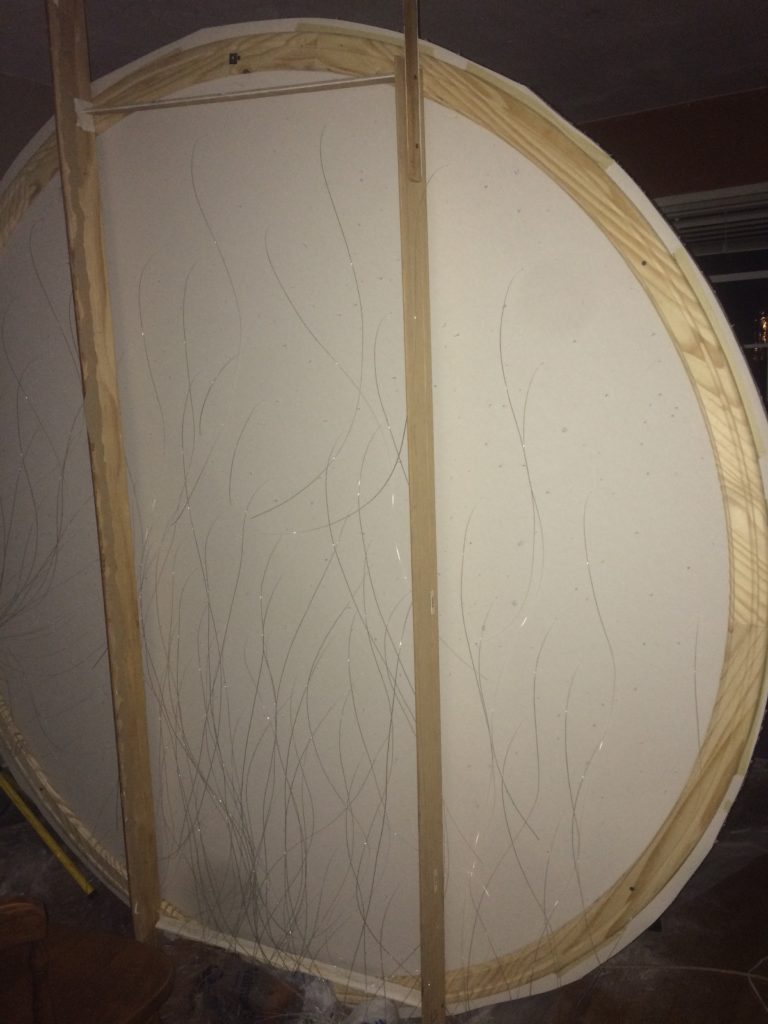
Anyway, so during the actual star construction I was able to project the whole mess of stars over the 8′ span. Be sure you secure everything as well as possible so you can get it right the first time- if anything moves in the slightest its going to be a pain to re-index it all. I did bright stars/constellations in larger diameter fibers (initially just used a different color marker dots). After you have all your stars marked you can put away the projector (for now). Next, try & get your pregnant wife to help you spend the day drilling 1000 tiny holes- or, if you have to use her strategically, drill all the holes yourself and just get help threading them through the board because that’s WAY easier as a two person job.
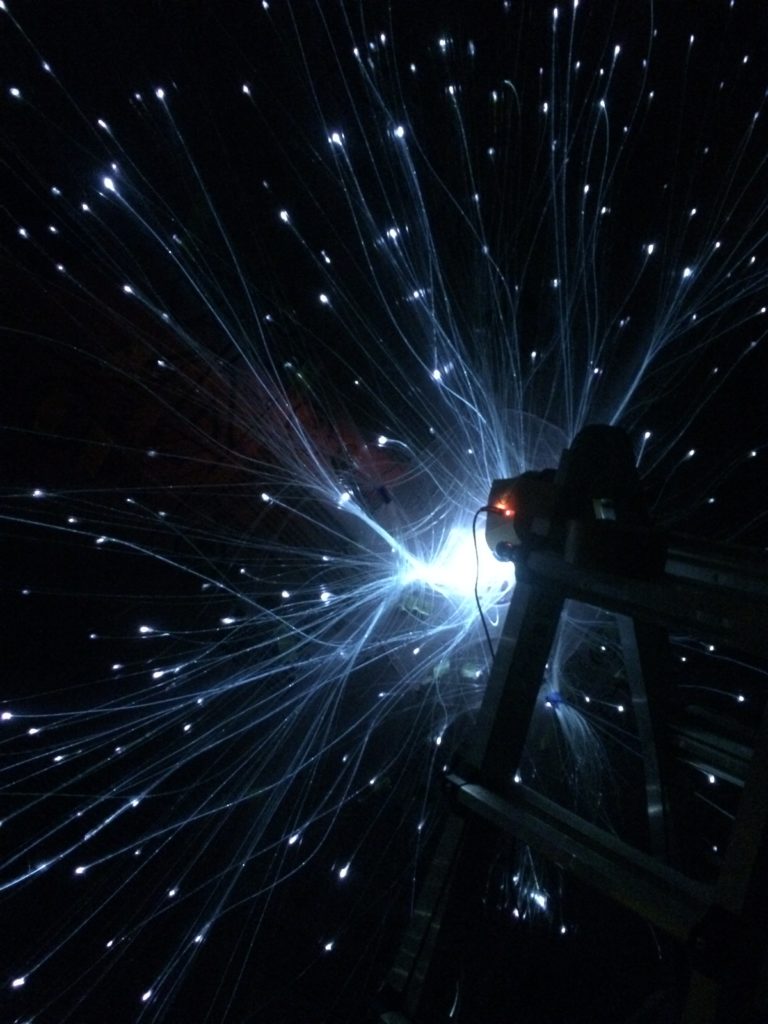
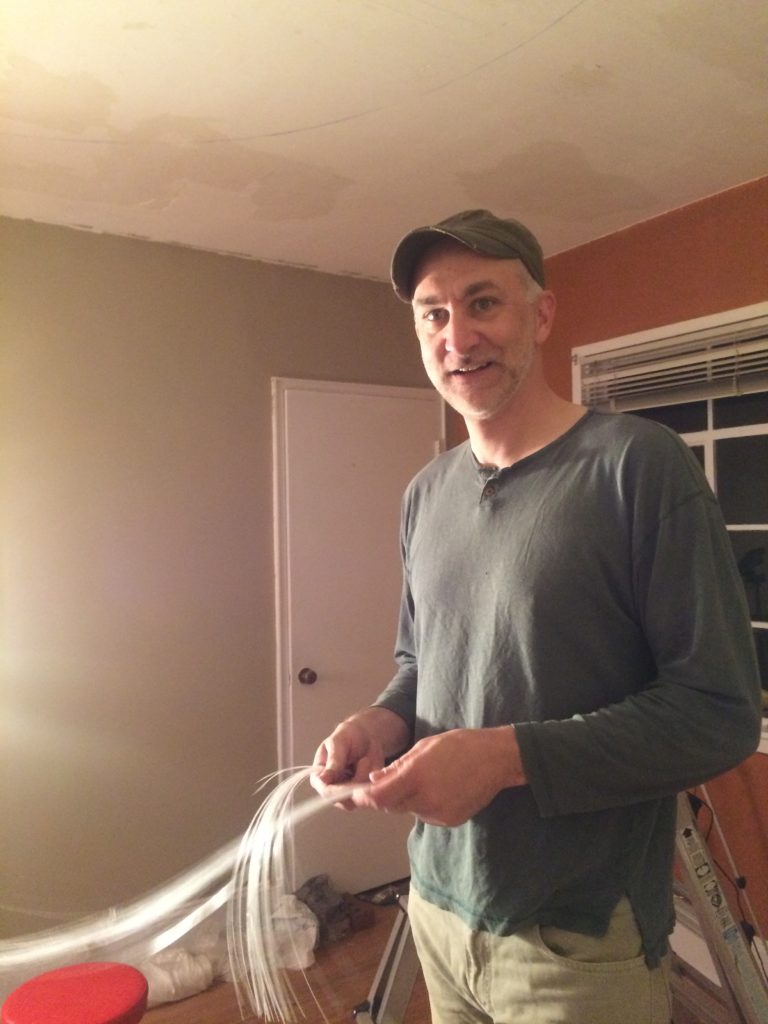
Ok, got all that? The end is (potentially) near! So now you have your laminated foam sheets. You have your wood ring holding onto it. You can trim it up now to make it flush to the ring if you like. When you get the fiber optics from the kit you’ll want to choose one that includes fibers long enough to reach the radius of your circle since your light source will likely be near center. Nearly every kit you get will give you fibers of the same length which means the stars near the center will leave you with a ton of extra length which you can reuse if you want. We did that and also added more bought fibers to fill out the constellation. The extra fiber strands I packed into a pvc tube, matched it to a high brightness led flashlight that I’d cut the head off (you just need the led and a focusing lens). You want to orient the white light from that lens so it just covers the bunched fibers that are now arranged in a circle in your tube (this is a function of the distance from the lens). When finishing that PVC bit, epoxy the fibers in place, cut & sand them flush, and polish the ends back to transparent so that they transmit the light effectively (or skip that entirely if you’re satisfied with the kit). We tried to distribute the ones that would route to the box evenly and then the rest as well (which would just be white). That will take some planning- and although it still looks good, I think we could have improved that a bit in our example.
At this point, you should have your fibers sticking out about 1/4″ from your surface. This is a good time to do any painting you have in mind- the extra stubby little fibers aren’t very hard to get around, but you want to still have enough sticking out that a final trim with a sidecutter will produce a clean cut fiber with a paint-free hole so small that its nearly invisible in a lit room. After said paint dries you can trim (or sand if you’re reallly careful) those pokey fibers back so they are flush with the surface.
This whole thing is now ready to mount up to the ceiling. It pays to make this as light as you can manage while still being structurally sound. I actually went so far as to lay out the joist structure in my attic so that when we mounted it all the 4″ long screws hit wood instead of plaster. Not sure that was necessary but ours is pretty big. I think we avoided having to drive any screws through the starfield as a result though – so, win? One thing that I did do though was take a few random sheet metal scraps, cut them into discs and then perforate them with a nail and bond them using epoxy near the center area that would be accessible through the ceiling. After the initial mounting via ring, I went up in the attic and secured these to joists strategically so that this assembly is also held from the center as well as the perimeter. So far so good.
At this point, just wire up your electrical in the attach and voila! You’re done!… unless you’re me, and you have to make your life harder. So even though I originally wanted to make this date D’s birthday- that’s a lot of work to wrap up the day after your kid is born. So I settled for the date I found out about her. Also, actually having the baby kinda bent the timeline a bit- so a few months later, I followed up on adding constellations in UV invisible ink. This would have been WAY easier if I did it before hanging it. I was also considering a more artistic interpretation, but I settled for straight lines by hand- drawing them awkwardly upside down. But- they came out pretty well all things considered, and now we can have star parties any old time in any weather. I did experiment with some different UV colors, but found that standard bright shade of cyan worked best so that’s what most of it is. We have a few extra details for the north star and such, but generally we’re pretty happy. I still may add a perimeter strip of lighting but it results as a bit of an odd room lighting technique that looks more like an eclipse. Jurys still out on that for now but this is the cliff notes “how to” for a fairly complex project. Hope you enjoy!