This project has been through the wringer a few times and I ended up making it way harder than necessary, but the end result is decent. Starting with technology and basic goals: I wanted to have an upstairs dog door that was big enough for our Dogs, Wyatt- a 105lb golden retriever with 3 legs due to cancer, and a 14yr old lady dog Trouble with stiff joints and frequent trips out back.
Problems to solve:
Any door this size would typically allow any typical person to enter the house at any time.
A typical dog door is poorly sealed, and with a recent doubling of our gas bill, we’d prefer to contain our heat/cool as well as we can.
Along with the poor thermal sealing, gaps in a standard vinyl/plastic door allow bugs, mosquitoes/critters to get in as well, and are typically either passive or require a user to manually insert or otherwise interact with a thing to secure. Nobody wants to do that every day.
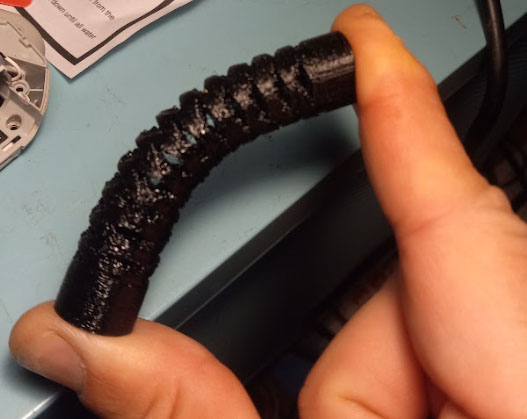
All of the above is at least partly addressed with this solution, and to make it even more challenging, I decided I wanted to make the whole mechanism seamlessly integrated. Basically just a “magic” door that firstly identifies the furball interested in crossing the border, then unlocks a deadbolt, and then opens using this segmented (this was a tricky assembly 3d printed in PETG), spring buffered, lead screw actuator. At the heart of the actuator is a planetary gear motor. It spins this lead screw (conveniently cheap and available as 3d printer hardware). Against nearly all internet advice I went ahead and welded the end of my compression spring to a steel sleeve which is press fit onto the brass acme nut. Fatigue and spring temper be darned… so far so good! I really just didn’t have any clearance and its already challenging to get the leverage I need with an assembly within the very door I’m trying to open. I’m not sure I’d do that again if i had it to do over.
Anyway, so I used an ESP32 module and even managed to get OTA programming to work- very cool! This unfortunately occupies the Serial monitor although I understand there’s a way I can get around that with Telnet or a webserver. I’ll (maybe) get to that later, but as it stands, it’s pretty cool that I can change up the code without even connecting. I used this tiny motor driver board which to my delight includes coincidental current limiting that I wanted to include anyway at just about the right current so that if a dog or whatever blocks the path of the door it just stops, untill the timeout and then returns home, rather than fries something or cuts a dog in half. The truth is I probably won’t get around to properly current limiting in the code because it hasn’t been a problem, but I should.
A lovely consequence in setting up the OTA code is that I can now reference server time and set a locking schedule (this is partly coded, but still hypothetical at this writing). So I can lock only after hours so the door will just open and close during the day when everybody’s home anyway. Honestly, it’s still our fenced backyard in a safe neighborhood so I’m not super worried anyway, but at least I can secure the door on a schedule as needed. The lock design works but has trouble with the built in limit switch feedback I intended. As such it just runs to timeouts which isn’t ideal. Oh well. I’m not changing that hardware now and it does work well. It’s built from a little gearbox motor on a long threaded axle. Unfortunately all this hardware doesn’t quite align voltage wise, but its all close enough. 5v is ok for ESP32, it’s a bit low for the drive motor and high for the lock motor. I could put a buck or boost converter in there but everythings doing pretty well and I’d rather move things along quicker if anything.
The door driver includes a single “cherry” style momentary reference switch. This opens a circuit on full open and full close so there are some bits of delay code to trim up the position tuning and to start it moving. That seems to work well. Honestly the hassle of wiring up this door section and keeping it all internal was one of the biggest setbacks here so I’m all about reducing the # of wires & complication to a bare minimum. I think one of very few fortunate coincidences with this project was the realization that this very solid door is internally made from sections that have occasional internal gaps of about 3/16″. I drilled my holes directly on one so that I could sneak wires down that gap all the way to the back. Whew! Even so, I had a broken wire or two late in the game I had to awkwardly redo.
I also added a switch at the rear door spine so that the ESP can know when the (regular) door is open and skip the whole dog door operation.
Presently, it also counts how many times the dog door has run its routine, which I basically did just for fun. It’s neat that I could individually identify which dog is using the door and log exactly when as well. I guess that’s dog stalker mode. Not quite sure why I’d do that except that I can (and anyway, we know it’s all Trouble). Regarding those beacons. They were from Blue Charm beacons- and incredibly I reached out to them (presumably the owner) and he had done a similiar project- I think it was a feeder? using these very tags. I wish I’d reached out sooner, it would have saved me a lot of trouble, but anyway he generously shared his code and kick started the coding end of this. Lots of his code is here verbatim. The beacons themselves as received were a lot bigger than I wanted but I couldn’t find anything with comparable features & specs so I got ’em. Fortunately the PCB included a button, battery clip and considerable extra space that I decided to just chop off and enclose with a custom 3d printed tag of much smaller size. I ended just just bonding it closed and finishing it up since you can still program it via bluetooth using an app and I wanted it weatherproof. It should run around 3yrs with the current (largest I’ve ever seen) button cell, and probably more if I use the motion sensing feature. The motion detect would be perfect for this of course, and I go back and forth on that detail but I think it takes a bit more of a knock to trigger than Wyatt’s inches of fluff typically deliver. Although it would help in the rare but occasional case where he lays down near the door and spends the day watching it open & close. In any case, with his prognosis, 3 weeks at this writing would be more than enough run time 🙁
I’ve come to believe that BLE is the right choice of tech for this, over RF, IR, or passive/active RFID tags. Suffice it to say that it works pretty well. The detection is usually set to its minimum range of (up to) -40dBm which they say is .1-.2M or sometimes -20dBm. Another nice thing about these tags is that they are broadcasting as “Wyatt704-519-XXXX” so anyone with bluetooth will get his name (or Trouble’s) and my phone # to reference. I wonder if there is another app that will let me tune the range with more precision. If you know of one let me know, but otherwise I will say I’m really pleased with Kbeacon and Blue Charm Beacons especially for the code!- speaking of which, mine is ugly and needs a lot of refinement but it works for now here it is.
Update: We all knew the spring would break and it did. It took a few hundred cycles and it broke right where we expected, at the weld. Fortunately a new elastomeric spring was designed/printed (diamond cutouts to minimize expansion/contraction) and I’m happy to report its better in every way so far and still going strong: